


FAQs About Fuel Tank Test Bench
2025/12/26
Share:
How to Properly Inspect a Car Fuel Tank?
As a crucial component storing fuel, the condition of the car fuel tank directly affects the normal operation of the vehicle.
First, before inspecting the fuel tank, ensure the vehicle is turned off and parked in a safe, level location.
Inspecting the fuel tank's exterior is the first step. Check the surface for obvious dents, scratches, or rust. If rust is found, it may indicate that the fuel tank's protective layer has been damaged and needs immediate attention to prevent further corrosion.
Next, check the fuel tank's sealing performance. This includes ensuring the fuel tank cap's sealing gasket is intact and checking for looseness or leaks after tightening the cap. You can also use the smell to initially determine if there is a fuel leak.
Next, check the fuel level in the tank. Most vehicles are equipped with a fuel gauge, but these may have some margin of error. To more accurately determine the fuel level, use a dipstick. Before measuring, let the vehicle park for a while to allow the fuel level to stabilize. Then, pull out the dipstick, wipe it clean, and reinsert it to read the level.
Additionally, check that the fuel tank's vent is clear. A blocked vent can create negative pressure in the tank, affecting fuel supply.
How to Regularly Inspect the Fuel System?
Inspect the Fuel Tank and Fuel Lines: Visually inspect the fuel tank for obvious damage, dents, or cracks.
Check fuel line connections for tightness and signs of wear or aging.
Pay attention for weak or bulging sections in the fuel lines, which may be signs of impending rupture.
Inspect the Fuel Filter: Replace the fuel filter at the intervals recommended in the vehicle manual.
Check the filter for signs of blockage, such as an abnormally high pressure reading on the pressure gauge.
Inspect the Fuel Pump: Listen to the sound of the fuel pump operating; unusual noises may indicate a problem.
Test the fuel pump pressure to ensure it is operating within the specified range.
Inspect the Injectors: Use diagnostic tools to check the injectors' operation, ensuring they are spraying fuel evenly.
Clean or replace injectors with carbon buildup or blockages.
Inspect the Fuel Pressure Regulator: Ensure the fuel pressure regulator is leak-free and can properly regulate fuel pressure.
Inspect the Fuel System Sealing: Perform a pressure test to check the entire fuel system for leaks.
Pay special attention to the fuel tank cap's seal to ensure it is properly sealed.
Regularly clean the fuel system. Depending on vehicle usage, the fuel system should be cleaned and maintained every 10.000-20.000 kilometers [[5]].
You can choose to clean it yourself, such as by adding fuel cleaner or using a bottled cleaner.
Alternatively, seek help from a professional technician for a more thorough cleaning.
What are the steps for inspecting a car's fuel system?
Inspecting a car's fuel system for leaks involves several steps. Here is a detailed inspection procedure:
1. Visual Inspection:
- First, inspect all visible parts of the fuel system, including the fuel pump, fuel filter, fuel lines, fuel injectors, fuel pressure regulator, fuel line connectors, fuel rail, and the fuel tank and surrounding area, looking for any obvious traces of oil or leaks.
2. Cleaning and Restart Test:
- Clean the potential leak area, then start the car and observe these areas for any new oil traces, especially when accelerating; see if fuel drips or vapors appear.
3. Soap and Water Test:
- Apply nitrogen or other inert gas at a certain pressure to the suspected leak area, then apply soap and water to the connection point. If a leak is present, the soap and water will form bubbles at the leak point.
4. Fuel Pressure Test:
- Using a special tool, connect to the fuel system, pressurize the fuel system, and maintain a specific pressure for a period of time. Observe whether the pressure gauge stabilizes or drops to determine if a leak is present.
5. Specialized Equipment Testing:
- For modern vehicles, especially those meeting China VI emission standards, diagnostic tools (such as ODIS) are used for system diagnostics, including fuel system sealing checks. For example, diagnostic programs can be used to check the sealing of the fuel tank ventilation system, or a smoke detector can be used to detect minor leaks within the fuel system.
6. Component Function Testing:
- For certain specific components, such as the DMTL (Dual-Stage Fuel Tank Vent Valve) pump and solenoid switching valve, ODIS can be used for actuator diagnostics to check their proper functioning.
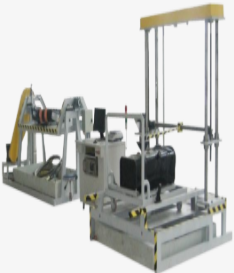
How to Test the Airtightness of a Car Fuel Tank?
A car fuel tank airtightness testing device is used to detect whether a car's fuel tank is leaking. It helps automotive repair personnel accurately determine if there is a leak, allowing for timely repairs and ensuring the vehicle's normal operation and driving safety. The following details the operation method of a car fuel tank airtightness testing device.
The operation method of a car fuel tank airtightness testing device can generally be followed as follows:
1. Preparation: Ensure the device is connected and in normal working order. Check that the power supply and sensors are functioning correctly.
2. Determine the Target: Identify the car's fuel tank to be tested, ensuring there is no residual fuel or other debris inside.
3. Connect the Device: Connect the device's testing probe to the fuel tank opening. Ensure a tight connection to prevent gas leakage.
4. Set the Pressure Value: Set the required pressure value according to the car manufacturer's requirements. This can usually be adjusted via the device's control panel or buttons.
5. Start the Test: Press the start button on the device or the corresponding button on the control panel to begin the airtightness test.
6. Observe the results: Observe the results on the equipment's display screen or indicator lights. Normally, a normal automotive fuel tank airtightness test result should show as "pass" or "qualified".
7. Handling Results: Based on the test results, if the test result is qualified, it indicates that the automotive fuel tank has good airtightness. If the test result fails, further inspection and repair of the fuel tank sealing components are required.
8. Disconnection: After the test is completed, disconnect the equipment from the automotive fuel tank. Pay attention to safety and ensure that the equipment and fuel tank are in a safe condition.
Operating the automotive fuel tank airtightness testing equipment allows for quick and accurate detection of fuel tank leaks. This operation method is simple and easy to implement, helping automotive repair personnel to promptly identify potential problems.
What is the difference between a test bench and a test rack?
Test benches and test racks have significant differences in function and application.
Test benches and test racks have significant differences in function and application. Test benches are mainly used for simulating environments, performance measurement, standardized testing, R&D verification, and troubleshooting, while test racks are mainly used for testing PCB circuit boards to ensure the quality and performance of the circuit boards. Test benches typically provide a range of test instruments, tools, and environments for detailed measurement and analysis of specific performance, functions, or characteristics. Test fixtures, relying on test racks (i.e., clamps), are used to test for short circuits between different network traces on a PCB, open circuits from the same network to each pad, open vias, and can also perform insulation strength and impedance tests. The choice between test benches and test fixtures depends on the specific test objectives and requirements.
Previous: FAQs About Temperature Shock Chamber
N e x t : FAQs About Friction Resistance Test
