




Search keywords:
product name, product type, model number,
test method, manufacturer, technique, application
-
Cone Calorimeter
The import of American VTEC, cone calorimeter ultra high cost performance
more
-
Digital Elmendorf Tearing Tester
Pendulum method test material tear strength, operating more simple, more accurate data
more
-

ZwickiLine Materials testing machines
Top of the world's leading universal material testing machine
more
Glass Optical Distortion Tester
BACK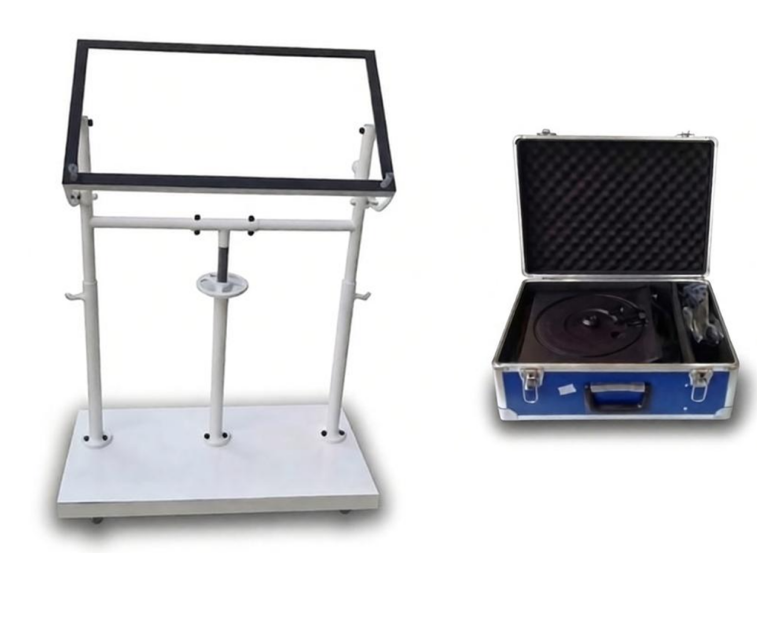


Standards:
Applications:
The instrument adopts a standard light source, providing stable performance and reliable operation for long-term use. The projection slide can be rotated at any angle, effectively solving measurement challenges caused by different stripe orientations during optical distortion testing.
Product Information:
The Glass Optical Distortion Tester is mainly used to measure the optical distortion of safety glass for road vehicles. It is an essential testing instrument for safety glass manufacturers and research institutions to perform product acceptance inspection, quality control, and performance evaluation.
Instrument Structure and Specifications:
The Glass Optical Distortion Tester consists of several main components, including a slide projector, projection slide, and lens assembly.
Auxiliary Accessories:Test Sample Holder,Screen (to be provided by the user)
Slide Projector
The instrument is equipped with a dedicated slide projector specially designed for optical distortion measurement.
Projection Slide
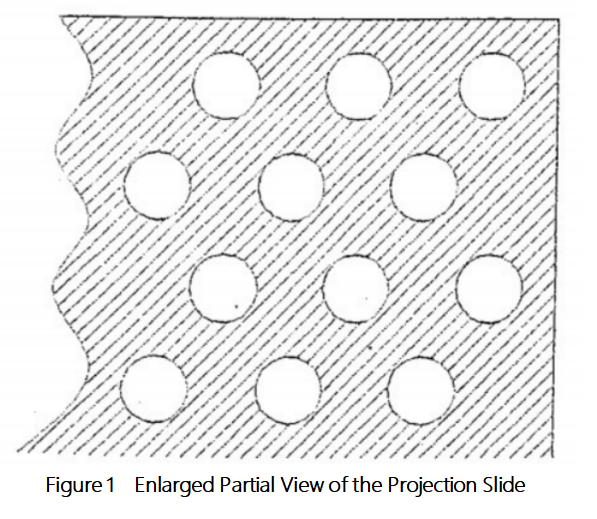
The projection slide consists of a bright circular dot array on a dark background (as shown in Figure 1), which is used as the standard optical distortion pattern during testing.
Test Sample Holder
The sample holder is used for mounting the test specimen. It can be adjusted by rotation and movement in both horizontal and vertical directions, allowing accurate positioning of different glass samples.
Screen
A white projection screen.
Structure and Specifications of the Slide Projector
Structure
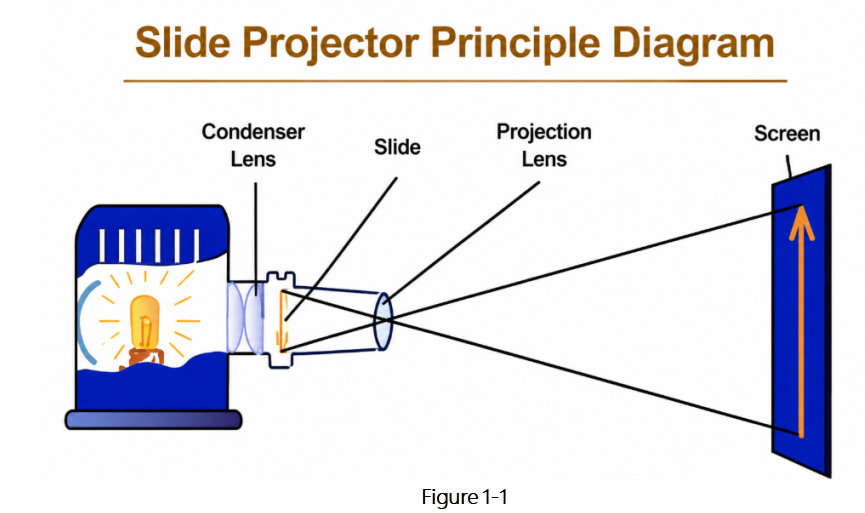
The slide projector consists of three main sections: the optical system, mechanical transmission system, and electrical control system. Among them, the optical system is the core component of the slide projector.
The optical system mainly includes:Projector housing、Light source、Condenser lens、Projection slide、Condenser cover
The imaging principle of the slide projector is shown in Figure 1-1.
Specifications
A. Lens Specifications:
Focal Length: 70–125 mm
F1:2.8
B. Input Voltage: 110–260 V
C. Light Source: Halogen lamp
Circuit System:
The circuit system consists of various electrical components and control circuits.
The main circuits include:Illumination circuit,Cooling circuit,Circuit protection system,Overheating protection system
Cooling System:
The cooling system mainly consists of: Cooling fan,Heat sink,Heat-insulating glass.The cooling fan is powered by 12V DC, 3A.
Equipment Installation and Operation:
Assemble the equipment according to the figure above.
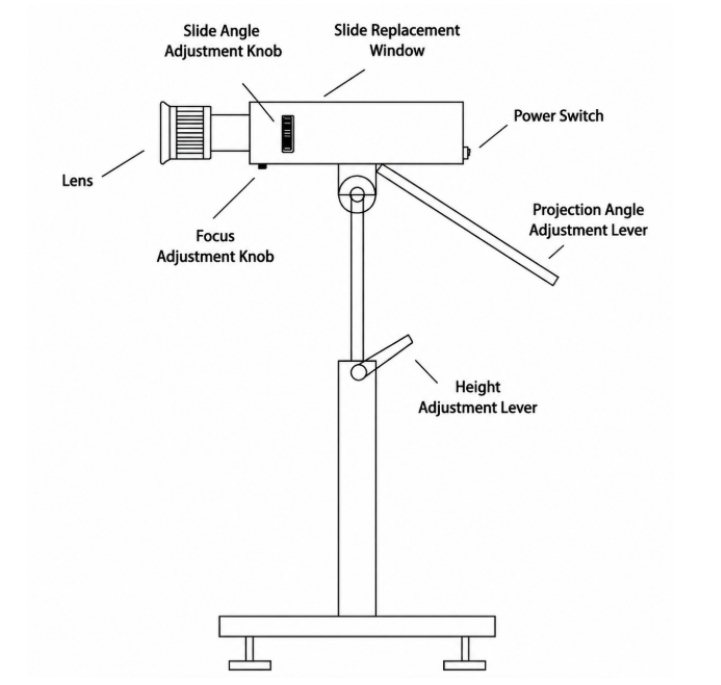
Adjust the leveling feet of the base to ensure that the base is approximately horizontal.
Open the slide replacement window and install the required projection slide.
Turn on the light source switch.
Loosen the projection tilt adjustment rod and adjust it to the appropriate angle.
Move the coarse adjustment handwheel left and right to project the image onto the screen.
Use the coarse adjustment handwheel together with the fine focus adjustment lens to adjust the image to the required size and achieve the best clarity.
Ensure that, without a test specimen installed, the diameter of the circular bright spot projected on the screen is 8 mm.
Install the test specimen on the sample holder according to the actual vehicle installation angle.
Rotate the test specimen horizontally to ensure that the horizontal tangent line of the measured point is approximately perpendicular to the observation direction. Move the specimen horizontally or vertically to inspect the entire test area, and measure the maximum deformation of the projected circular image on the screen.
Calculation of Optical Distortion
The optical distortion is calculated as follows:
Δα=Δd/0.29R2
Δα — Optical distortion, unit: arc minutes (′)
Δd — Maximum deformation value of the projected circular image
R2 — Radius of the projected circular image
Daily Maintenance:
Keep the slide projector clean at all times.
Keep the fine adjustment lens clean. If there is any dirt or contamination, do not wipe it directly with hands. Use a cotton swab dipped in a small amount of alcohol and gently remove the stains.
If the equipment is not used for a long period, it should be powered on and operated regularly. Check the condition of the power cord before operation.
Precautions:
The instrument must be properly grounded to ensure safe operation.
Before use, first check whether the power supply meets the required specifications and inspect the power cables and plugs for any damage.
After powering on, if the cooling fan does not operate, stop using the equipment immediately.
Keep the instrument away from magnetic fields and static electricity.
Do not directly touch the optical lenses or halogen lamp with bare hands.
To prevent electric shock and ensure the quality of optical components, do not disassemble any optical parts without authorization.
