


NewsInformation Center
How to operate the Digital Elmendorf Tearing Tester?
2022/03/11
Share:
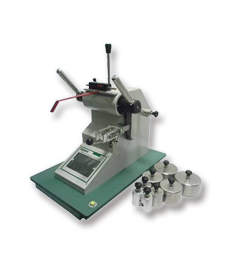
The Digital Elmendorf Tearing Tester can test the force required to expand a specified length of a variety of sheet or film specimens under a specified load and a specified crack using the Elmendorf tearing method. It can detect the tear strength under the impact force of 200-30000cN, and the impact force corresponds to a specific drop weight. The instrument now cuts a tongue-shaped incision in the sample, and then measures the tear strength as the incision expands. The design of the instrument is convenient and flexible, and can be used for various tests of light and heavy samples.
Operation method:
1. Place the instrument on a horizontal laboratory table and fix it.
2. Plug in the power cord on the back of the instrument.
3. Select the appropriate weight or weight combination to install as shown below.
4. Installation and calibration (the instrument needs to be calibrated every time the position is changed, and the calibration weight is 3200cN).
(1) Press the right button under the bottom of the instrument by hand, turn on the power switch for 5 seconds, and release the right button.
(2) Press the left and right buttons on the bottom of the instrument at the same time with both hands, the pendulum will be released (leave both hands away quickly, pay attention to safety).
(3) The pendulum swings freely under the action of gravity, and the panel displays the pendulum position immediately until the pendulum stops completely (it can also be stopped manually).
(4) Press the right button under the bottom plate again, if you hear a beep of the buzzer, the calibration is passed, if there is no sound, the calibration fails, you need to adjust the horizontal position and re-calibrate.
(5) After installation and calibration, the pendulum is reset and the power is turned off.
5. Test Calibration
A. Turn on the power.
B. Install the weights.
C. Set the test unit, the number of sample layers, and the number of samples.
D. Click the Calibration button to enter the calibration interface (re-calibration is required every time the machine is turned on or the weight is replaced).
E. The interface displays the calibration weight range or the wrong weight range "No".
F. Check that the mobile gripper is locked.
G. Press the left and right buttons under the bottom of the instrument with both hands, the pendulum will be released (leave both hands away quickly, pay attention to safety).
H. The information interface displays the calibration result. If the calibration fails, check the instrument (moving the fixture, serious level imbalance, excessive friction, etc.) and re-calibrate.
I. The calibration is successful and the pendulum is reset.
6. Test method
A. The test calibration is successful, press the test "Test" button or confirm the "Enter" button to enter the test interface.
B. Clamp the sample between the two clamps as required, and lock the clamps.
C. Depress the handle of the knife to cut the sample (the experiment will not be carried out if the sample is not cut, and the sample will be buzzed when repeatedly cutting the sample).
D. Press the left and right buttons on the bottom of the instrument with both hands, the pendulum will be released (leave both hands away quickly, pay attention to safety).
E. The test results will be displayed in the test interface, and the tear force and span percentage will be calculated.
F. Press the button "Accept" or "Reject" to continue the next test and display the current test sample serial number.
G. After the sample test is completed, a new test needs to be performed, click the "New Test" button for the new test.
H. If the weight needs to be replaced for the new test, it should be recalibrated after changing the weight, and then test.
7. When the test is over, turn off the power.
If you are interested in Digital Elmendorf Tearing Tester, please leave us a message!
Previous: Details of ZwickiLine Materials testing machines
N e x t : Mask Breathing resistance testing machine 10-point maintenance plan
